For this first project, I started with a Stratocaster as a base for the body and neck shape. However, the similarity to this iconic Fender model ends there. I've always dreamed of a guitar with a wraparound bridge, like the ones found on Gibson Les Paul Juniors and Specials, and I'm a fan of the same brand's P90 pickups . So, it was with this in mind that I set about building my first electric guitar from November 2019 to January 2020.
To cut the body and neck, I used MDF templates from Guitelec. I had one template for the body's outer shape, one for routing the neck joint, and one for shaping the neck itself. I then cut the body with a band saw and finished the shape cleanly with a router using the templates. For my first guitar, I chose to make a slightly different model by adding a rabbet all around the body. This small step is inspired by the "German carve" that the German luthier Roger Rossmeisl used on Rickenbacker guitars in the 1950s, a technique still practiced by many luthiers today. It adds depth to a flat-top guitar. I wanted something simple to make but with character. To make it easier to access the higher frets and add a little extra touch, I rounded the heel of the neck.


For the handle, I started by making a tool that would allow me to neatly rout the truss rod. It's relatively simple to make: I attached two aluminum angle brackets, high enough to serve as guides for the router, to a piece of lacquered plywood. The two brackets are drilled at each end to allow the insertion of two nuts and bolts used to hold the piece of wood in place.
Once the markings are in place and the installation is complete, all that remains is to route the hole with a 6mm bit. I opted for a Music Man-style truss rod, with an adjustment wheel at the bottom of the neck. This model seemed simpler to install than the models used on Fender guitars. This type of truss rod requires some machining of the cavity that houses it and also of the fingerboard. If the fingerboard extends beyond the neck (22 frets or more), a small cutout must be made in the bottom of the fingerboard. The cavity in the body that holds the neck must also be machined to accommodate the adjustment wheel.


Once the routing was done and adjusted, I then cut the neck using my Jazzmaster jig (I wanted a wider headstock than the standard Strat) by reversing it. The neck cut is done in the same way as the body, using the jig, which must be positioned very precisely so that the truss rod routing is perfectly centered.
As for the fingerboard, I used a rosewood fingerboard that was already slotted to a 648mm scale length. I didn't have the proper tools to do the slotting myself, and I felt there were already too many delicate operations involved. Since this seemed essential for accurate intonation, I opted for a pre-machined fingerboard. However, I still had to glue the fingerboard in place, radius it, mark the fret positions, fret it, install the nut, and shape the back of the neck. These operations aren't always as simple and straightforward as they seem, and the most difficult step isn't necessarily the one you expect.<br><br> The carving or shaping of the back of the handle, for example, was unexpectedly not only a very pleasant operation to carry out but also much less difficult than I had anticipated.


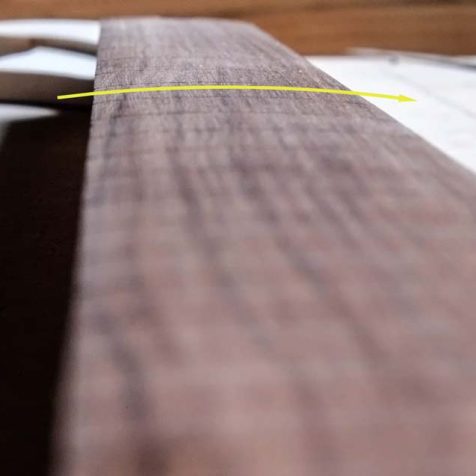
12″ is exactly 304.8mm, which corresponds to the radius of the wraparound bridge I'm going to use. This wasn't so easy to do. I confidently set off with my 12-inch radius gauge and 80-grit sandpaper. Thinking it would be a breeze, I went at it with gusto, checking occasionally, but not often enough. I ended up with a fretboard with an off radius, especially at the bottom of the neck. So I had to sand much more than planned and deepen the fret slots, which I wasn't equipped to do! So I bought a special saw to redo the slots.
To personalize the guitar a bit more, I wanted to create a slight difference in thickness on the headstock, a sort of notch. So I made a template to be able to make the cut cleanly with the router. The idea was to paint the part with the tuning pegs and leave the wood exposed on the thinner section.


There was still some work to be done on the body: routing the holes for the pickups and the cavity for the electronics. I also had to drill the holes for the inserts to attach the wraparound bridge I got from luthier DasViken , made by San Lorenzo . And then more grinding, sanding, sanding… to apply the finish.
This is where things went wrong… I wanted a natural finish with a simple wood stain and linseed oil. To be honest, I knew absolutely nothing about wood finishes, so I did a few tests, which turned out to be disastrous! I tried different stains that clashed terribly with the alder. It was obviously necessary to let it dry and then sand each time, and the further I went, the more disastrous the result became… So I went back to my initial plan and applied a nitrocellulose primer and a metallic Ocean Turquoise paint. I'll just have to try again for the natural finish! This time, the result was there, despite the difficulties of spray painting with a workshop temperature of around 10°C.


Pickups pickups , as I'd already been winding my own pickups when I started this project. It was therefore obvious that I would make my own pickups , and the opportunity was perfect for some testing. So I wound two pickups : one extremely overwound with 44AWG copper wire and two hold a special place in my for a few months P90 Alnico 9 magnets measuring 18.6kohms, and another, more conservatively wound one with 43AWG wire and Alnico 4 magnets for the neck pickup.
After about a week of actual work, not counting waiting for tools, drying time, and other delays, the result is here, far exceeding my expectations and quite different from what I originally envisioned. The shape/configuration specifications are met, but the finish and pickguard are different from what I had planned. The original pickguard, also made of steel, which I had laser-cut by a local company, will be fitted to another Charger S, this time with a natural finish. The Charger will be a guitar model I offer once my professional guitar-making business is up and running.